


Here is the official Wikipedia definition:
Cascarones or confetti eggs are festive, hollow chicken egg shells, filled with confetti, meant to be thrown or broken over someone's head(usually as a surprise from behind), scattering confetti all over the person. Breaking the eggs over someone's head can be painful if done hard enough, but since the eggshells are so brittle no one normally gets hurt. This tradition is most often carried out among friends and family. Cascarones derived from Mexico and have recently regained popularity in the southwestern United States. They are used for many different occasions but, especially Easter. Having one broken over your head is said to bring good luck.
We live in South Texas- San Antonio to be exact- and this is a favorite with my boys. Fiesta, Easter, Birthday Parties- talk about a ton of fun! The mess afterwards...not so much my favorite. But it is all in good fun and no matter how many dozen cascarones we make, it just is never enough!
Here is basically how to make them:
What you need:
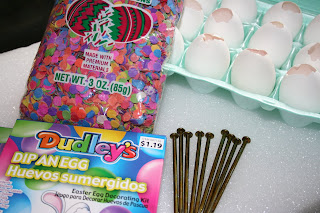
Eggs
Easter Egg dye
Tissue Paper cut into 2x2 inch squares
Glue
Confetti - any "hole punch" kind or tiny shredded kind will do fine
Styrofoam Block
Long Nails
Foam Brush
What to do:
1. Make your "Egg Dryer"
 This step is best if you do it ahead of time. Take a styrofoam block and press the long nails into the styrofoam. Make sure (with your plain white egg-maybe a couple) that each nail is far enough apart from the next nail, so that the eggs will not touch each other. All eggs are just a little different in size, and you want to utilize your space wisely.
 2. Empty eggs of contents.

This you can do a couple of different ways. I use a butter knife and tap the "pointy" end so that it has a small hole or crack. Then I carefully peel away a dime size hole in the tip of the egg. Shake out all of the egg contents and wash carefully...eggs are fragile! I just lay them on a paper towel on the counter- they dry in about a day.
Note: I usually plan way in advance- so when I make breakfast through out the year, I prep the eggs for cascarones. I store the eggs in the carton the arrived home in- once they are dry. Then I just store them in the garage until it is time to dye them.
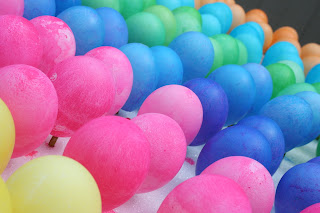
4. Dye the Eggs
Now it is time to dye the eggs. I use the Easter egg dye kits you can find at almost any store: Local Grocery Store (H.E.B for us here is SA), Wal-Mart, Target, Local Drug Store. I like to go after the Easter holiday and buy a couple of extra boxes (on sale)- the dye is a little hard to find when you want to do them for a birthday party later in the year.
Work in batches of one color. As you color each egg, place the egg on a nail pushed into a block of styrofoam.
Note: You can also use regular food coloring dye as well- I just find that the easter dye works better. It gives a stronger color.
5. Dry Colored Eggs
 Once you have dyed the eggs in batches, they need to be dryed. This is where the Egg Drying Contraption comes in- made in step 1. If you are afraid to get dye on your hands, wear gloves and use tongs during this part. Drain each egg very well, and turn it upside down onto a nail. The more liquid you remove from the egg- the faster it will dry, and the less messy too. It might be best to place this outside to dry- it can be a bit messy.
6. Fill Egg with Confetti
 Once the eggs have dryed completely-it will take several hours. Fill each egg with confetti. There are a couple of ways to fill the eggs. You can hold the egg over a confetti filled bowl and put the confetti in the egg by hand or with a small spoon. Or- you can use a small funnel-put the funnel in the egg and pour the confetti in the top.
 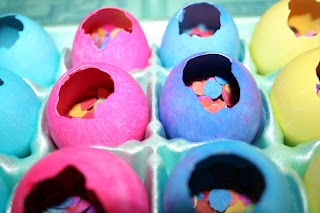 How much confetti? That is really up to you. You really don't want to fill the egg up too much, so usually filling 1/3 to 1/2 of the egg is about it.
Note: We added glitter to the confetti one year...not really recommended. Glitter, while pretty, doesn't feel pretty in the eyes. Plus it is difficult to remove from your scalp and other places it gets into. I think I still have some in my ears...
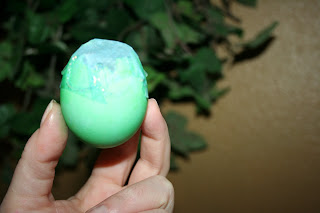
7. Cover Egg with Tissue Paper
 Once you have filled an egg with confetti, take the 2x2 inch squares and place them on the open end of the egg. Dip your foam brush into the glue and brush the tisuse paper onto the egg. Make sure to press down the parts of the tissue paper that may stick up. This doesn't have to be perfect- you just want to make sure the tissue paper sticks to the egg completely.
Note: I also like to use a crafter 2 in Circle Punch instead of the 2x2 inch squares.
8. Options
After the tissue paper dries, you can always add a little sparkle. While glitter mixed with the confetti is not the best idea- glitter glue is acceptable for the outside of the egg. Once the tissue is dry- I like to use glitter glue around the egg as decoration or on the tissue paper.
Check back after Easter- I'm sure I will have fun photos of the Cascarone in action!


 We signed him up with the team my neice was on- that way he would at least have a friend to hang out with. Lets just say, every picture I took...well, he has a huge smile on his face! He had so much fun- and even scored a goal!


 We take the piggies outside every couple of days.


